Jeep Parts Wiki | Ford Parts Wiki
Home | Search | Browse | Marketplace | Messages | FAQ | Guest
|
Body Service Manual August 1964 |
|
Prev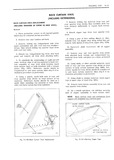

 Next
Next
5I 22 FOLDING TOP H 8 Install slide fastener onto zipper assembly 1 IUsing chalk mark as guide locate rear half 9 Staple both sections or zipper tape together of zipper to new back curtain vinyl Zipper tape Staples will aid in preventing zipper scoops from may be stapled to new back curtain to aid in holding disengaging and also serve as a stop for the slide zipper in proper position during sewing Operation fastener Fig 5152 2 Sew zipper to new back curtain assembly 10 Operate slide fastener to closed position 3 Place back curtain window assembly on clean ll Tack zipper tape to rear quarter trim stick covered work bench with interior vinyl surface of Fig 5I52 Zipper tape should not be pulled taut back window valance facing down Transfer marks as zipper teeth may show through top material after on old back curtain to new back curtain assembly top has been properly installed See steps 5 and 12 of removal procedure 12 Install trim sticks with attached back curtain 4 Center and position back curtain assembly to assembly into body rear trim stick over attached compartment bag NOTE Mgte sure that allntrim stick are NOTE Notch in back curtain vinyl at lower ed ge driven completely inn to r epr e sient finished indicates centerlinewof back curtain assembl i cor W TK Q Fgtjllil In addition back curtain lower gge should extend 1i 2 below lower edge of trim 13 Check contour of back curtain assembly at Ql i pinchweld molding Where required place ref 5 Tack Curmm tm mm and rem quarter trim erence chalk mark on outer surface of back curtain Sticks along pinchweld finishing molding Readjust back V curtain assembly by retacking curtain to rear or 6 Tacks securing back curtain assembly to trim l 111 1u 1 li i trim Sticks 35 1 lui1 d sticks should be placed close to each side of every p bolt hole in trim sticks Then pierce or punch cur 14 D ti Ch 1 m tom Suck with attached back tain assembly for each trim stick bolt mu tHm assgmbly from bUdY 7 Inspect rubber trim stick fillers cemented to 15 CBJ fuuY replace OP in ljositmn in mm body below pinchweld Re cement if necessary lu l t m E H 16 Using nitrile cement or neoprene type weath lx jp erstrip adhesive fasten rear quarter flaps to side roof rear rails Make sure that rear quarter Hap kx seam is even with forward edge of side roof rear n A Ky rail Install side roof rail rear weatherstrip to help 7 6 Aix maintain position of quarter flaps while adhesive is X5 V dryinff I fg 0 V V 17 Using ureviouslv marked lines end of trim V I 7 l r iQ sticks and bolt hole locations in top material as a locating reference tack top material to rear and V ry 0 B4 1 ear quaiter ti im stir s r 1 it STAPLE i 18 Install top material into body Make sure rf B rear and rear quarter trim stick attaching bolts are j 7 completely driven in to represent finished 7 condition as ucxs l l 4 I 19 Check fit of top material Rear quarter trim 17 ll sticks may be adjusted downward to remove minor wrinkles in top material in rear quarter area ijj F GY672 20 Where required re mark top material then make necessary adjustments to top material by re positioning rear quarter trim sticks or by retacking Fig 5 I 52 Zipper Installation at Rear Quarter Trim Stick top material to rear or rear quarter trim sticks