Jeep Parts Wiki | Ford Parts Wiki
Home | Search | Browse | Marketplace | Messages | FAQ | Guest
|
Corvair Chassis Shop Manual December 1964 |
|
Prev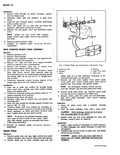

 Next
Next
3 Apply rubber lube to push rod surface Position complete pedal assembly to support and insert push rod through rubber boot Install clutch pedal cross shaft from right side so that shaft goes through support assembly pedal and bushings Secure by installing support bolt with lock washer and special washer NOTE On Powerglide models install pedal pivot pin from left side so that pin goes through support assembly and pedal bushings Hold head of pivot pin securely against support and install a new push on type retainer There should be no end play in pin after retainer is installed Install retainer so that flush side is snug against support 4 Install clutch pedal secure with lock washer and nut and torque to 30 35 ft lbs 5 Install pedal stop and stop light switch and adjust brake pedal free play see Push Rod to Main Cylinder Clearance Also install clutch pull back spring SHOES AND LININGS NOTE If brake drums are worn severely it may be necessary to retract the adjusting screw To gain access to the adjusting screw star wheel knock out the lanced area in the web of the brake drum using a chisel or similar tool Release the actuator from the star wheel by lifting with a small screw driver and back off the star wheel with a second screw driver press down on handle to retract shoes CAUTION After knocking out the metal be sure to remove it from the inside of the drum and clean all metal from the brake compartment A new hole cover must be installed when drum is reinstalled a F T i z y Fig 18 Unhooking Pull Back Springs a r Fig 19 Removing Hold Down Springs and Pins Removal 1 Raise the vehicle and place on stand jacks 2 Loosen check nuts at forward end of parking brake cable sufficiently to remove all tension from brake cable 3 Remove brake drum NOTE Since boots are recessed in grooves on wheel cylinders to prevent pistons from leaving cylinders it is not necessary to install wheel cylinder clamps when brake shoes are removed however brake pedal must not be depressed while drums are removed 4 Unhook brake shoe pull back springs from anchor pin and link end using Tool J 8049 fig 18 5 Remove the actuator return spring 6 Disengage the link end from the anchor pin and then from the secondary shoe 7 Remove hold down pins and springs using a pair of needle nose pliers fig 19 8 Remove the actuator assembly NOTE The actuator pivot and override spring are on assembly It is not recommended that they be disassembled for service purpose unless they are broken It is much easier to assemble and disassemble the brakes by leaving them intact 9 Separate the brake shoes by removing adjusting screw and spring 10 Remove parking brake lever from secondary brake shoe rear only 11 Clean dirt out of brake drum using care to avoid getting dirt into front wheel bearings Inspect drums for roughness scoring or out of round Replace or recondition drums as necessary 12 Inspect wheel bearings and oil seal and replace any necessary parts 13 Carefully pull lower edges of wheel cylinder boots CORVAR SNOOP MANUAL