Jeep Parts Wiki | Ford Parts Wiki
Home | Search | Browse | Marketplace | Messages | FAQ | Guest
|
Body Service Manual August 1964 |
|
Prev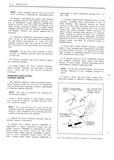

 Next
Next
4226000
4226000
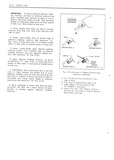
FRONT END 1C T original adhesive caulking material that remains 13 With aid of helper lift glass with one hand on pincllweld flange Additional brisk application on outside of glass and one hand on inside of glass of prilner 0n flat rubber spacers is necessary to jgtrefutty move glass up to tvintlshield opening insure a good bond of material to spacers maintaining glass in a horizontal position While one man holds glass in this position the second CAUTION D0 not allow primer t0 drop on ui dgj ild FM w1n h G1dvp1u uv m d vaulted Smfaces Ur trim puns iolc D ass l Ilv ll s man can ieael aiounc wlnt shield pillar Fig l 1l Carefully posltlon glass NOTE lf the windshield opening is freshly t l 1 f OI Jp n u E mui1 1 F I H1nwilt gigs painted due to collision work etc apply paint 1 m 1 CE Q E lik t bl I r m PPSIFIY3 4 ima finish primer to painted pinchweld flange Paint U s ig Ibp cgli t D qU E Abb dm finish primer is available as a service part m Pl Us BSA lIl lF1 C I 14 Press glass firmly to set caulking material 7 Cut off tip of one nozzle along score line Fig 1C12 This nozzle will be used t0 apply bead of 15 Inspect installation for proper seal between 1l lh lV Gm llklne llkltallil tl sl1l S Cut lll OU caulking material glass and opening lf a gap is other nozzle at 45 angle 1 below end of nozzle mOum rgd use cwikmg gun to Jpply Sufficient This nozzle will be used to apply sniear l e l material imin outside tne glass to fill tne vein of adhesive caulking material t0 pincllweld flange 7 16 Watertest windshield immediately using cold 8 Will Surface nf SSIHSS rp which bead Of lids water spray If any waterleaks are encountered hesive oaulking material will be applied between use flapbklded SCr dri g1 O1 Stick and m k lll Sklll WPG and Edge nf glass wml A c1E caulkinv material into leak point to correct leak w tter dampened cloth Dry glass with it clean dry This OPENUOH is uiuuuy performed mOSt PREV Clmh tively from outside the body 9 Remove cap and protective end cover from CAUTION DU my mu A hem Stream Oi WMC one tube of Mlliesive cwlkine nmt ri l and insert tiitectly on eiutllnne tnnteeittl wntle tne tnittenttl glass bead nozzle cnt on score line in step T is stm SUN 10 Insert tube in a standard household type 1 Remove masking tape from inside of glass caulking gun reworked as follows and windshield opening al Widen end slot of caulking gun with a file to 18 Install upper and lower reveal moldings BC lll ll5D Sl g l0l l b garnish moldings and previously removed parts Clean up car and remove protective coverings IJ Grind down plunger disc on rod so that disc will fit into l lfg Bild of tl1lJ NOTE Unused adhesive caulking material re maining in tube can be stored for later use To ll Positioning the gun and nozzle as shown in Stm rgmgve HOMIE and insert End Cup No Figure ICU Bl 9l UY illlllly 1 Slllomll Cmllllluous viously removed Do not remove material from bead Ol cwlklne rnaterlel 3 8 lileli by 3 l6 wide nozzle until it nas euietl Once ni ttei ial nas ill base 0mPl l 1Y uwuntl inside Edge Of Z1 S5 cured it can be removed from ends of nozzle When material in first tube is dispensed quickly with Li ppm O1 DHHS insert second tube and continue application of bead After application check bead and fill all voids and air bubbles W ATERLEAK CORRECTION OF ADHESIVE CAULKED GLASS INSTALLATION NOTE Material begins to cure after 15 minutes U I V 1 114 t Kt T1 VKQ exposure to air therefore perform following Adhebllf mu G i gdsbfmbtfl Alon t E i i steps immediately and install glass in opening can be l l l1 ll f ll Y gje uhmuell it wm as SOOU as possible Qigvnig and l 1l1SL l lllg the g ass NOTE The following procedure is applicable 12 Remove elass I e l nozzle and insert only with tne use of ntlnesive caulking material smear bead nozzle nozzle cut on 45 angle in and primer furnished in Kit Part No 4226000 or step tt Holding caulking gin at an angle so that equivatenp angle cut of nozzle rests flat on pinchweld flange apply a thin 1 4 wide x 1 16 high smear bead 1 Remove reveal moldings ill area 0f leak of adhesive caulking material completely around pinchweld flange 2 Mark location of leaktsl