Jeep Parts Wiki | Ford Parts Wiki
Home | Search | Browse | Marketplace | Messages | FAQ | Guest
|
Body Service Manual August 1964 |
|
Prev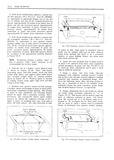

 Next
Next
4226000
4226000
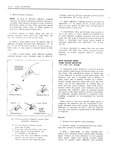
REAR QUARTER IE T 13 Remove glass bead nozzle and insert smear bead nozzle nozzle cut at a 45 degree NOTCH GLAss BEAD CUT SMEAR BEAD angle in steu No 8 Holding caulking gun at an E G RE 1 NOZZL MON SCO NOZZLE ON 5 anrle so that oiening of nozzle rests flat on pinrti LINE DEGREE ANGLE eild fl1n e ipply thin 1 4 v ide it 1 16 hi ch w g z j i g O smear bead of adhesive caulking material com 0 r V pletely around pinchweld flange 4 4 may wd K Qi A lg is jg 14 With the aid of a helper carefully install W glass as described in step No 4 see Fig 1E 10 e i ty and Fig 1E 11 Make certain that glass sets 5 Y zf J pro Jerly on spacers and does not have to be shifted V w I E g 7 after material contacts pinchweld flange Align it tape on glass with tape on body to guide window ae E F i MASKING TAPE I rr into opening 1 4 FROM GLASS EDGE NOTE When setting glass in opening make rx ll contact with upper edge of glass first and then ADHESIVE swing in lower edge in cAuu No 3 8 11 MMERIAL 15 Press glass lightly to adhere caulking ma 3 l terial to pinchweld flange and install stationary rear quarter window reveal moldings 16 From inside of body run a flat bladed stick around edge of pinchweld flange to force excess F 9 H2 AdhES Lqglinpi x eH I Appllcahm V caulking compound back into opening between glass Men S 9 l and pinchweld flange 9 WWE 5 1 f C Of QJHSS to which b id Of id 17 Watertest stationary rear quarter window hesive caulking material will be applied between immediately using 3 cgld water Sprgiyy H nny masking tal and edge Of gkwsl with B CIBBU Water waterleaks are encountered use 1 flat bladed tool d9 mP d FHEL DYY 355 Ih0 O h1Y with j 1 or stick to work caulking material into leak point dry rag W NOTE This can best be done from inside the 10 Remove cap and protective cover from one lf OdY After l l lt t9 t mOVG MPG fmm mSl 4 tube of adhesive caulking material and insert Surface Of 1 glass bead nozzle one cut on score line 18 Install all previously removed trim and hard 11 Insert tube in a standard household type Ware wd remove protectw col rmgS caulking gun reworked as follows NOTE Unused adhesive caulking niaterial re a Widen end slot of caulking gun with a file mqmmg m tube C3n1l StTr G hi img usa EO sufficiently to accept dispensing end of tube Si 1 lemcve mm E lm mw LIL Em ply viously removed Do not remove material from b Grind down disc on plunger rod so that disc nozzle umu It his Cured gmge uYECl 1Li i4l l l will fit mm large and Of tubg can bs rlemoved fom nozz c in one piece 1 a pair o p iers 12 With caulking gun and nozzle positioned as M N R WATERLEAK CORRECTIONS illustrated in Figure 1E 12 carefully apply a w H ADHESIVE CAULKING MATERIAL smooth continuous bead of caulking material 3 B IN A QURED STATE high 16 Wide at base Completely Mound msldg Adhesive caulked glass installation waterleaks edge ot glass can be corrected in the following manner Ethout NOTE When material in first tube is dispensed and msmumg the ghlbh quickly insert second tube and continue applica NOTE The following procedure is applicable tion of bead This material bevins to cure after only with the use of adhesive caulking material fifteen 15 minutes exposure to air therefore and primer furnished in GM Kit Part No perform the following steps immediately and 4226000 or equivalent install glass in the opening as quickly as possible 1 Remove reveal moldings in area of leak