Jeep Parts Wiki | Ford Parts Wiki
Home | Search | Browse
|
Body Service Manual August 1964 |
|
Prev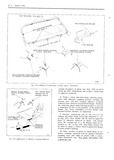

 Next
Next
226000
226000
REAR END 1F 5 11 Remove cap and protec tive cover rom one 19 Install all previously removeci parts and re tube 01 adhesive caulking material and insert move protective coverings e lass bead 1102zle on cut on score line NOTE Unused adhesive caulking material re 12 insert tube in a standard household type ixnaining in tube can be stored for later use To eaulking gun reworked as follows store remove nozzle and insert end cap pre viously removed D0 not remove material from a Widen end slot of caulking gun with a file nozzle until it has cured Once cured material suffieientljr to accept dispensing end of tube can be removed from nozzle in one piece with a pair of pliers b Grind down disc Oll plunger rod so that disc will fit into large end of tube MINOR WATERLEAK CORRECTIONS With caulking gun and nozzle positioned as WITH ADHESIVE CAUI KING MATERIAL illustrated in Figure 1F 5 carefully apply 1 smooth IN A CURED STATE continuous bead of caulking inaterial 3 8 high by g 16 Wwe Ay b 5 r Comppsyely mommy msmn Adhesive eaulked glass installation waterleaks miie of gpmg can be corrected in the following rnanner 111 removing and reinstalling the glass NOTE V11Cll material in first tube dispensed quickly insert second tube and continue applica NOTE Th T Y TT0WTT lQ PT 0C Tu is l l TTl iT TG tion ni imti rms n1 1tet 1a1 begins to Care after only with the use ef Mlliesive wulkiris marerinl fifteen 15 minutes exposure to air tlierefore E1 fO1 I1l the following steps iininediately and 1 T A install glass in the opening as quickly as possible A D H E S I V E CAULKINGU 14 Remove glass bead nozzle and insert T MATERIAL j2 smear bead nozzle nozzle cut at 45 degree I Q if angle in step No 8 Holding caulking gun at an i e 2 angle so that opening of nozzle rests flat on pinch r we A weld flange apply a t11i11 1 4 wide 1 1 16 high smear head of adhesive cau1ki11gn1 1teri11l COll1 E T pletely around pinchweld flange 15 With the aid of a helper grasp suction nups TRTM to PRIME previously applied and carefully install glass in body opening Make certain that glass sets pro g Qgfzf x T perly on spacers and does not have to be shifted pl after inaterial contacts pinchiveld flange Align OpERAT gN A OpERAT ON B tape on glass with tape on body to guide window i11to opening NOTE TV l I l setting glass into opening it should Appwzm g 7 FLA SUCK be in same plane as opening so that all edges of glass contact pinchweld flange at approxiinately i the same time I XT WORK 1 i l3 5 16 Press glass lightly to iil 1llE 1ll111 11lQ l1l l V terial to pinohweld flange and install baek window 1 OPER TION C OPERATION D TNA reveal moldnigs r V Fig lF6 Cn reetien ot Adhesive Cniilked 11 F1 l 1ll inside of body run a flat bladedst1ck mass Insmnmirm Wnmrlg L around edge of pinchweld flange to force excess caulking compound back into opening between glass Ar mm QH Gdh sivg Cuulwnq mmgriuy Glow a11d pinchweld flange A I a 18 Watertest back window innnediately using a B Pi irne meas indicated using small tinisli cold water spray If a11y waterleaks are eneoun C Apply ddliesiye enullainq rnnteriul use tered use a flat bladed tool or stick to work l i1 l226000 Oi equivalent caulking material into leak point This can best D Using tint stick yml ndlieziye cutilklnq be done from inside the body After watertest mmeiinl well into lolnts ot oiiqnql ninietinl remove tape from inside surface of glass pninled body flange n l glue