Jeep Parts Wiki | Ford Parts Wiki
Home | Search | Browse | Marketplace | Messages | FAQ | Guest
|
Body Service Manual August 1964 |
|
Prev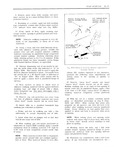

 Next
Next
42260000
42260000
2E 3t REAR QUARTER T Adhesive caulking glass installation waiterleaks 4 A Ban be corrected in the folluwing manner gi ut A T removing and reinstalling the glass Auuesnve CAULKING Q MATERIAL T X NOTE The lollowing procedure is applicable T A only with the use of adhesive caulking material and primer furnished in GM Kit Part No Tv 7 422600001 equivalent I 1 I em ve reveal nieldiiigs in area ot leak TR M TV PRlME Il 2 Mark location of leak s 0 4 f V 4 NOTE It leak is between aiilliesive caulking OFERATTON A OPERATTON B material and betty or between material and glass carefully push outboard on glass in area of leak to determine extent ol leak This operatioii should be performed while water is being applied APPLY Y FLAT STTCK to leak area Mark extent ol leak area I From Outside body clean any dirt or foreign V Jomts material fl C l tl leak area with water and then dry TQPERATIQN C OPERATION D nj r l4 111ierla1 ea with an air hose 4 Using a sharp knife trim off uneven edge ol Fit 2Ei2 Ci ri e rio w of Adhesive Cgnilling Gil tg adhesive Qaulking material see operation A in lnsmllmiun ret e Li pm QELLZ nr me leak point and three te four inChC S T T V on both sides beyend limits of leak area nm Utt 1 l vr l 9 n ill ng matenai elaine eaqe sr qltng B Pvfnw merit r tltt ve4l mma tl m l lzmsh C p 1y etetlwegive qinliang mmyql Um my egggwgn 5 Using a small brush apply LlCll1 S1 wzaulkmg tw eqnt lt t T material primer over trimmed edge of adhesive D ll5i i tl f sficIl I rl mdltesive eatdl ing rniixterlml well ggulkjug material and over adjacent 7 1lllt9 TT SU1 11 F l pp7 r 0 Ongmel rncrteverql petmetl lwsely flange intl See OPNm p B in pip gE4g flHt lJlz1 l d t0Ol to work miaterial into leak point 6 Apply gdhggive caulking niaterlal as 4hUWl1 lll Renmve tape frovn inside surfatce ol pEi mnm C in Fig 2E42 at leak point and three to four inches on both sides beyond limits of leak 21 Install all previously removed parts and u g remove pmtective coverings T Ininierliately after performing step No G use NOTE Unused MlhE5iVE u T T T TTTl F9 a tlat stiek or other suitable flat bladed toul to mmmng in Tube can be STOTGTT TUY IME U5 T0 work adhesive caulking material well into leak Stwe remove nozzle and insert end cap pre Wim and nm jtimt O1 original material undlveclyw vinusly renioved D0 not remove lllt1tE l lLilfl Olll gffggt yi w 1tgi tight seal along entire lemitll uf TTOZZTE M11 it TUS C i 9d OYTQG YU T mTTt mT material application see operation D in Fig can be re nioved frcwm nozzle in one piece with a 25 425 pair 0f pliers 8 Watertest spray te assure that leak has been MINOR WATERLEAK CORRECTIONS Cm 1 gqm 1 2 run a heavy stream of VLlt 1 directly on freshly applied adhesive eaulking With adhesive caulking material in a cured state material