Jeep Parts Wiki | Ford Parts Wiki
Home | Search | Browse | Marketplace | Messages | FAQ | Guest
|
Body Service Manual August 1964 |
|
Prev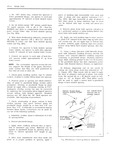

 Next
Next
4226000
4226000
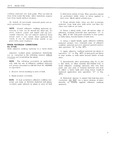
REAR END 2i 5 13 Wipe surface of glass to which bead of ad NOTE When setting glass into opening it should hesive caulking material will be applied between be in the same plane as opening so that all eclgvs niasking tape and edge of glass with a clean of glass contact pinchweld flange at approxi water rlampened rag Dry glass thoroughly with 1 mately the same time ylean dry rag 19 Press glass lightly to adhere caulking m i 14 Remove cap and protective end cover from terial to pinchweld flange Do not use too mueh one tube of adhesive caulking material and insert pressure as excessive squeeze out will be visible Mglass bead nozzle nozzle cut on score line after reveal molding installation Install reveal moldings 15 Insert tube in a standard household type pmllklllg em Y w 1 kE d its f u S 20 Working inside the body run a flat bladed H Widen ud S1m Of Caulkmg gun with 3 fw to tnnl or stick across top and up sides of opening to V V Y o press squeeze out material bank into opening be n ept dispensing end of tube V V e tween glass and pinchweld flange b Grind down plunger disci on rod so that disc Wlu ht mm large end of imb9 21 Watertest back window immediately using a cold water spray If any waterleaks are en 16 With caulking gun and nozzle positioned as eotnitcred use a flat bladed tool or stick to work illustrated in Figure ZF5 carefully apply a smooth continuous bead of caulking material 3 8 high by 3 16 wide at base eompletely around inside edge of glass 4 S 5 V NOTE When material in first tube is dispensed ADHESIVE 4 quickly insert second tube and continue applica CAULKING L MATERIAL V tion of bead This material begins to cure after fifteen 15 minutes exposure to air tliereforc A perform the following steps immediately and in A stall glass in the opening as quickly as possible I 17 Remove glass bcad nozzle and insert smear bead nozzle nozzle cut on 45 angle Holding eaulking gun at an angle so that angle Cut HUM y X PRIME of nozzle rests flat on pinchweld flange apply a y thin 1 4 wide x 1i 16 high smear bead of adhesive eaulking material completely around I V pinchweld flange V OPERATION A OPERATION B 18 With the aid of a helper carefully install glass in body opening Make certain that glass sets properly on spacers and does not have to be shifted after material contacts pinehweld flange Align APP Y g F AT 51 C tape on glass with tape on body to guide window into opening See Fig ZF6 Llie f h lg t WORK I i INT0 i Joims TAPE iB0DYI OPERATION C OPERATION D INA TAPE I GLASS I rr 7 O y Fig 2F7 Cc ttection of Adhesive Ccelked Elms ee w gV Inst Il ti n Wuteileqka P if ll I ei A mm sti ediiesaye eeiiiitan n ien I t W 9 ii Ionq edge ct qlciss I J l p l l B Prime re s indicated using cz small V M r r M brush C A li adhesive cciullsing material I PP Y k Use Kit 4226000 or equivalent Ir D Usin tlat stink weik qdhesiye 9 isis cuelking n teii l well into joints of original nmtetiul painted body Fig 2F6 B l Window Installation Mgnge md gpm